Drywall Contractor Fairfax County VA| Drywall Repair; Drywall Installation; Painter in Herndon Reston

Interior Prehung

Metal Stud Walls

This is an excerpt from the Book called “Carpentry  by Des Moines, Iowa. Continue reading to learn more about Interior Prehung, thanks to the author.

Replacing a door in an existing jamb will mean scribing it to fit, cutting it, mortising it, and drilling new holes for the handle and lock.  Save yourself time and aggravation by buying a prehung door, which comes with the jamb and trim all precisely cut and matched. 

Choose A Door: Measure both the width and height of your rough opening; some older homes have 7-foot-tall doors.  Also measure the thickness of the wall or the old jamb.  If it is wider than 4 9/16 inches, you will have to attach strips of wood to the edge of one jamb to make it wider.  Make sure that the casing is wide enough to cover the gaps between door and jamb on the sides and at the top. 

Attach The Hinge Side: Position the door in the opening so that the edges of the hinge jamb are flush with the wall.  You may need to shim it to get it plumb.  There should be a set of shims every foot where the hinge jamb is not tight up against the stud.  Always insert shims from both sides so the jamb will not get twisted.  

Use a framing square to check the other two jamb pieces for square; you may need to raise the hinge side up slightly.  Drive 8d finishing nails through the hinge jamb and into the stud. 

Attach The Other Jambs: Close the door and make sure the gap between the door and the top jamb piece is a consistent ⅛ inch.  You may need to raise up the latch jamb; support it with small pieces of wood so it won’t move while you’re working. 

Choose A Door
Choose A Door

Insert pairs of shims every foot all along the latch jamb. (You will need to open and close the door repeatedly.) Check that the front edge of the jamb is flush with the adjoining wall.  Drive 8d finishing nails through the latch jamb and the shims.  You don’t need to nail the top jamp piece. 

Add The Casing Use a handsaw to cut off the shims flush with or below the wall surface.  Be careful not to damage the jamb while cutting. 

The casing will be preassembled or at least precut.   

Installing An Exterior Prehung Door 

If you are simply replacing an existing exterior door, a new prehung unit might fit right into the space. (Make sure the casing will be the right width.) The instructions on this page describe how to install a prehung door in a new space that you have cut out. 

Set The Door In Place: Most exterior doors have a wood threshold attached.  Replacing it with a threshold that has a rubber gasket provides greater weather protection.  Before installing, make sure your new threshold will fit under the door. 

These doors are heavy, so work with a helper. Slide the door out of its box.  Cut any plastic strips holding it together, but do not remove the block of wood holding the door closed. 

With the brick mold attached, lift the door into place so the brick mold is up against the house siding.  Have a helper hold the door on the outside while you work on the inside.  Check for plumb.  If you need to make any adjustments, place a shim under one of the jambs. 

Mark And Cut The Siding: Once the door is where you want it, use a pencil to mark the siding for cutting; the siding will butt against the brick mold for a tight seal against weather.  If your siding is vinyl or aluminum, you may need to cut back more to make room for special trim moldings. 

Remove the door, and cut the siding.  Set your circular saw’s blade depth so it just cuts through the siding.  For beveled siding, tack a piece of 1×4 to the side of the cut to provide a stable surface for the saw’s base plate. 

Weather-Strip And Install The Door: Cut strips of roofing felt (tar paper), and wrap all exposed wood with it.  Slip it a few inches behind the siding, and attach it to the framing with staples or roofing nails.  At the top of the opening, install a piece of drip-edge flashing.  (If it did not come with your prehung door, ask the supplier for one that will fit.) The drip edge goes between the siding and the felt, and it will hang over the brick mold. 

Set the door in place, and fasten the jambs with shims and 8d galvanized casing nails.  Caulk the joint between the brick mold and the siding. 

Installing A Lockset 

Installing a security deadbolt on an older door is similar to installing a door handle on a new door.  Installing the latch should be the last step in installing a door.  But first make sure the door fits well and swings freely. 

Drill The Door Holes: Fold the cardboard template that came with the lockset and place it on the door at the desired height.  Mark the center points of holes on the face and edge of the door by pocking through the cardboard with a nail. 

Installing An Exterior Prehung Door 
Installing A Lockset 

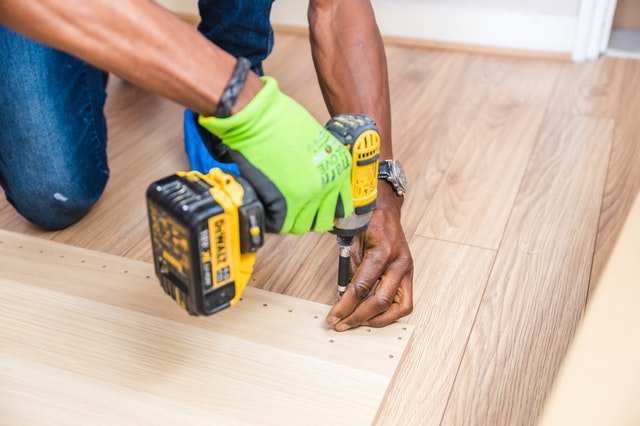
Use a hole saw to drill out the hole on the face of the door.  To avoid splintering the door, drill until the pilot bit starts to poke through, then drill from the other side.  Use a spade bit or Forstner bit to bore a hole in the door’s edge.  Brace the door so it does not move from side to side, and make sure you keep the drill bit level and parallel to the surface of the door.  Some locksets require that this hole continue into the rear of the larger hole through the face of the door. 

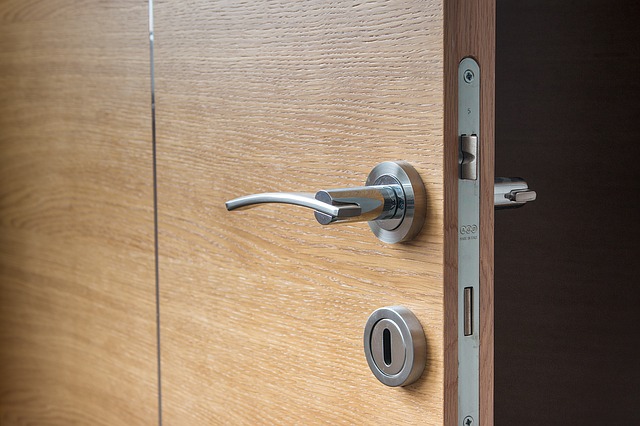
Install The Bolt And Lockset: Insert the bolt into the edge hole and hold it in position while you use a pencil or knife to mark for a mortise.  Cut the outline of the mortise with a knife, then chisel out the area between.  Be careful not to chisel too deeply; keep testing until the latch plate is flush with the surrounding wood. 

Drill pilot holes and drive screws to attach the bolt plate.  Insert the lockset parts on both sides, and drive the bolts to tighten them.  Make sure the bolt or latch slides freely when turned from either side.  If not, loosen the bolts a bit.  If that doesn’t work, remove the pieces and clean any debris from the holes.  

Interior Prehung

Install The Strike Plate: Start to close the door, and make a mark on the jamb’s edge showing the height for the center of the bolt or latch.  Make a mark on the jamb that is one-half the thickness of the door from the stop.  Where the two marks meet, drill a hole with a 1-inch bit. 

Place the strike plate on the jamb.  Hold it in place as you trace around it with a pencil and knife.  Cut the perimeter with a knife, and mortise it out until the strike plate sits flush.  Drill pilot holes and drive screws to attach the strike plate.  If the door does not latch, or if it rattles when latched, move the strike plate in or out. 

  1. Straight, clean holes make installation easy and make the latch and deadbolt operate smoothly.  Use a hole-cutting saw for the lockset; drill most of the way through one side and then finish the cut from the opposite side of the door. 
  2. Use the template provided by the lockset manufacturer to drill a hole for the bolt mechanism.  Insert the bolt and mark around the bolt plate to cut a mortise.  Fasten the bolt in place and insert the lockset parts from the front and back.
  3. To find the correct location of the strike plate, install it without mortising first. If the door does not latch, move it away from the stop.  If it latches but rattles, move it toward the stop.

Get Instant Quote